
Fingerstick monitoring remains a dependable way to guide daily diabetes decisions. The Freestyle Freedom Lite Meter offers simple operation, readable numbers, and small-sample testing. This overview explains setup, testing steps, maintenance, and savings tips so you can use it confidently.
Key Takeaways
- Simple testing sequence: insert strip, apply blood, read result.
- Maintain accuracy with control checks, fresh strips, and clean surfaces.
- Know common errors and quick fixes before you retest.
- Track batteries, memory, and dates to avoid data gaps.
Using the Freestyle Freedom Lite Meter: Step-by-Step
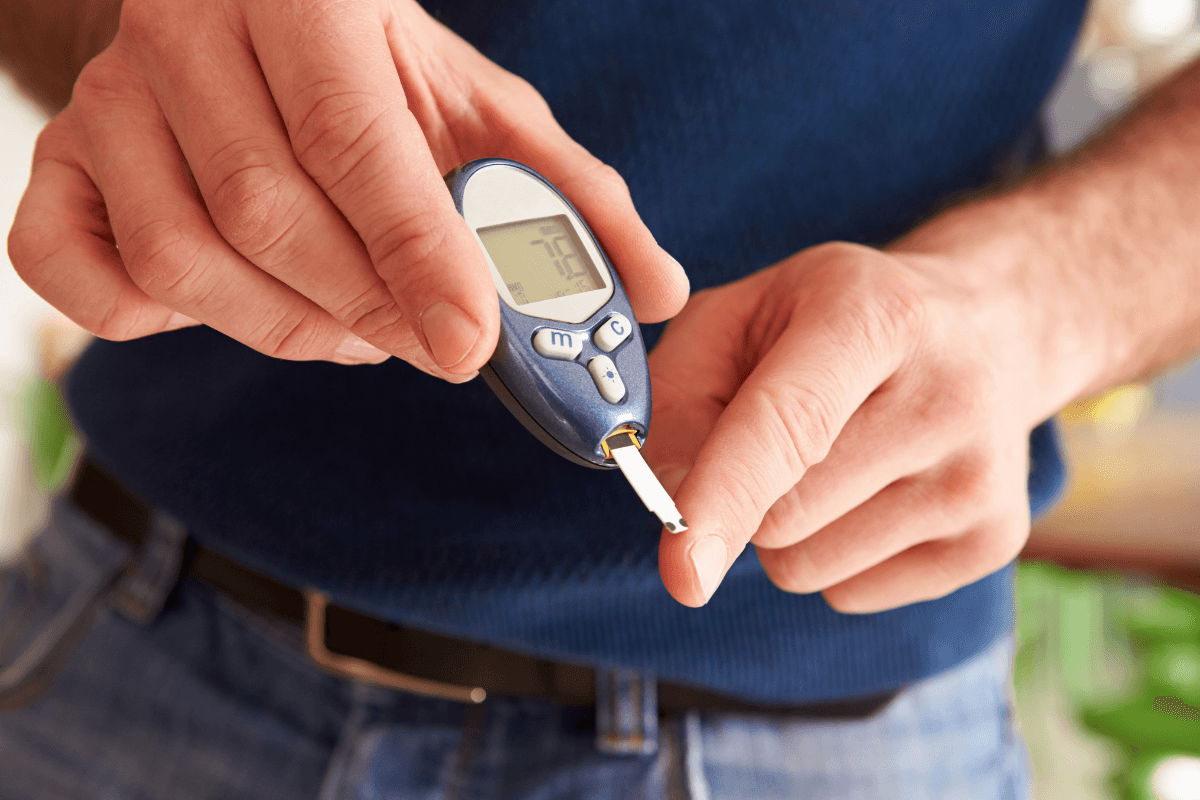
Start by washing and drying your hands. Clean, dry fingertips reduce contamination and improve capillary (fingerstick) sample quality. Place your supplies within reach: meter, compatible test strips, and a lancing device with a fresh lancet. Seat a strip firmly, then wait for the meter to prompt you. Prick the side of a fingertip, gently milk from the base if needed, and let the strip wick blood. Do not smear the drop or add more after the countdown begins.
Read and record the value. Consider noting context like fasting, pre-meal, post-meal, exercise, or illness. Context helps you and your clinician interpret trends, including risks of hypoglycemia (low blood sugar) or hyperglycemia (high blood sugar). For broader testing principles, see Glucose Monitors and Meters for a concise overview of device choices and use in daily care.
Prepare, Test, and Log
Preparation reduces repeat tests and wasted strips. Confirm the strip vial is sealed between uses and check the expiration date. Sit down, relax your hand, and warm fingers in cool rooms to support blood flow. After testing, safely cap and discard sharps. Log results consistently, whether in a notebook or a compatible app. Consistent logging helps you spot patterns like dawn rises or meal spikes. For basic self-testing technique, see Check Sugar Level at Home for a short refresher on at-home steps.
Tip: If you frequently need a second prick, reduce the lancing depth and warm your hands. Excessive depth can toughen skin and increase soreness over time.
Setup, Memory, and Calibration Basics
Initial configuration is straightforward. Set language, time, and date carefully so your readings align with meals and medications. If you change time zones, update the clock to keep logs accurate. Many users benefit from setting reminder alarms for fasting and post-meal checks. For first-time configuration, the phrase freestyle freedom lite setup often appears in quick-start cards and support pages; follow the steps in order, and confirm the meter turns off correctly before storing it.
Modern meters arrive factory-calibrated and do not require routine user calibration. Still, quality control matters. Use control solution when you open a new strip vial, after a drop or impact, or if results seem off. Keep the strip vial closed, and store it in a dry spot at room temperature. If memory fills, delete older results only after confirming they are backed up. For a wider look at device categories used in diabetes care, see Diabetes Devices to understand how this meter fits into the broader toolkit.
Strips, Lancets, and Cost Considerations
Strip handling can make or break accuracy. Keep strips sealed, dry, and within their labeled temperature range. Oils, lotions, and wet hands can dilute samples and skew readings. Pair the meter with a suitable lancing device; small, round lancets reduce friction and soreness. If your fingertips feel tender, rotate sites and consider a thinner gauge lancet. For a deep dive into strip and meter differences, see Types of Glucometers for context on technologies and sampling needs.
Some users explore a freestyle lite test strips alternative when insurance, supply, or store inventory changes. Discuss compatibility with your pharmacist or clinician before switching, because meters are designed for specific strip chemistries. If you need fresh strips, see Freestyle Lite Test Strips for compatible options and pack sizes. For more comfortable lancing, see Accu-Chek Softclix Lancets, or compare the Delica Lancing Device Guide for technique tips and depth settings.
Manuals, Error Codes, and Troubleshooting
When the meter beeps, stalls, or shows a symbol, start with the basics: check strip insertion, expiration, and sample size. Reseat the battery if the screen is blank. If readings do not match how you feel, wash hands and retest with a new strip. Perform a control-solution check to confirm the system behaves as expected. For brand-neutral comparison points and device features, see Best Blood Sugar Monitor for considerations beyond basic fingerstick workflow.
Manufacturers list common messages and their fixes under freestyle freedom lite error codes in the user documentation. Abbott’s support pages provide official guidance on symbols, testing steps, and control ranges. For product-specific instructions, Abbott product support offers a current owner’s booklet and quick-start materials (manufacturer support for Freedom Lite). For general regulatory context on home glucose meters, see FDA information on SMBG test systems (FDA device overview).
Battery and Maintenance
Meters rely on a stable power source. If readings take longer to display or the backlight dims, replace the freestyle freedom lite battery promptly. Always align polarity marks and ensure contacts are free of corrosion. After changing the battery, verify the date and time, then perform a control check to confirm normal operation. Keep a spare battery in your kit so testing does not pause during travel or illness.
Clean the meter exterior weekly with a soft cloth lightly dampened with soap and water. Disinfect surfaces that touch blood using an approved disinfectant; avoid soaking openings or the strip port. Allow surfaces to dry before testing. For alternative test systems if you need a backup device, see OneTouch Verio Flex Meter for a compact design, or Contour Next EZ Meter for a large-display option suited to low-light settings.
Programs and Savings Options
Managing supply costs helps sustain consistent testing. Manufacturer programs, such as the freestyle promise program, may offer savings on meters, strips, or control solutions. Pharmacies may list coupons or loyalty discounts for accessories. Insurance coverage varies, and requirements can change yearly. For benefits basics and coverage variability, see Supplies Covered by Medicare to understand how brands and plan tiers can affect your out-of-pocket costs.
Consider practical approaches beyond coupons: order the right box size, rotate testing supplies to use oldest strips first, and store them correctly to avoid waste. For lancet refills, Accu-Chek FastClix 102 Pack provides a multi-lancet drum design that simplifies changes. If you are comparing packs and accessories, browse Diabetes Supplies for a broader catalog organized by product type.
Compatibility and Alternatives
This meter is designed for specific strip chemistry, so cross-compatibility is limited. Always confirm that your vial matches the meter name and lot details. If a pharmacy substitution occurs, verify on the spot before you leave. Many users keep a second device at work or in a gym bag. Should you explore alternatives, check ease of use, display size, and strip availability. For side-by-side context, compare Contour Next Test Strips to understand handling differences and packaging.
Users often ask about freestyle freedom lite test strips versus other Abbott-family options. Match the exact brand and SKU listed in your meter documentation. When evaluating another meter, confirm sample volume, coding requirements, and backlight visibility. If you prefer a more compact platform or app-focused approach, the Dario Blood Glucose Meter offers a different form factor you can review. For broader education on testing frequency and context, ADA guidance on self-monitoring outlines when checks may be helpful (patient-focused SMBG guidance).
Recap
A smooth testing routine depends on reliable supplies, clean technique, and clear records. Confirm dates, store strips correctly, and review unusual results with control solution before changing care plans. Keep your manual handy and note common messages so you can act quickly and retest safely when needed.
Note: Safe use includes reading the manual, understanding error symbols, and keeping your clinician informed about meaningful trends or outliers.
This content is for informational purposes only and is not a substitute for professional medical advice.
