
The best insulin injection sites are areas with enough subcutaneous fat: the abdomen, outer thigh, back of the upper arm, and upper outer buttocks or hip area. Insulin should go into the fatty layer under the skin, not into muscle. Site choice, needle length, angle, and rotation all affect comfort and absorption consistency.
Why this matters: repeated injections into one spot can cause thickened tissue, bruising, or unpredictable glucose readings. A simple rotation plan helps protect the skin and makes dosing technique more consistent.
Key Takeaways
- Common sites: abdomen, thigh, upper arm, and buttocks.
- Usual angle: 90 degrees with many short pen needles.
- Skinfold use: helpful for lean adults, children, or longer needles.
- Rotation habit: move at least a finger-width from the last spot.
- Skin checks: avoid lumps, bruises, scars, redness, and irritation.
Where to Inject Insulin Safely
Safe insulin injection sites have a soft fatty layer and are away from scars, active rashes, bruises, or firm lumps. The abdomen is often convenient because it is easy to see and reach. Use the area to either side of the belly button, but avoid the two-inch circle around the navel.
The outer thigh is another common option. Aim for the front or outer side of the upper thigh, away from the knee and groin. The back of the upper arm can work, but many people need help reaching the right area without twisting. The upper outer buttocks or hip area may be useful when other sites need a rest.
For a more detailed site-by-site placement discussion, see Where To Inject Insulin. If you use a specific basal insulin, placement advice may also overlap with product-specific technique pages such as Lantus Injection Sites or Levemir Injection Sites.
Absorption Can Differ by Area
Injection site can influence how quickly insulin starts working. The abdomen often absorbs insulin more consistently for many people. The thigh and buttocks may absorb more slowly, especially at rest. Exercise can also change absorption from nearby muscles, so avoid injecting into a limb that will be heavily used right away unless your care team has advised that routine.
Try to keep similar doses in consistent regions. For example, some people use the abdomen for mealtime insulin and thighs or buttocks for basal insulin. Do not change patterns without considering your glucose trends and clinician guidance.
Insulin Injection Angle and Needle Depth
The safest insulin injection angle depends on needle length, body build, and whether you can lift a skinfold. Many adults using short 4 mm or 5 mm pen needles can inject straight in at 90 degrees. This places insulin into subcutaneous tissue for most body types.
A 45-degree angle may be used with longer needles, very lean body areas, children, or when there is a higher chance of hitting muscle. Some people use a gentle skinfold with a 90-degree angle when using short needles on lean areas. Others may use both a skinfold and 45-degree angle with longer syringes, depending on training from a clinician or diabetes educator.
The goal is not to inject as deeply as possible. The goal is to reach the fatty tissue under the skin. Intramuscular injection can make insulin absorb faster than expected and may increase the risk of glucose swings.
Quick tip: If injections suddenly hurt more, review the needle length, angle, and site before assuming the insulin is the problem.
Why Pinch Skin When Injecting Insulin?
Pinching, or lifting a skinfold, creates more space between skin and muscle. It can help when a person is thin, when the site has little fat, or when a longer needle is used. The fold should be lifted gently with thumb and fingers. Do not squeeze hard enough to bruise.
If your clinician taught you to pinch, keep the fold raised while inserting the needle and delivering the dose. Release it after the needle is removed, unless your device instructions say otherwise. If you are unsure, ask your diabetes educator to watch your technique once.
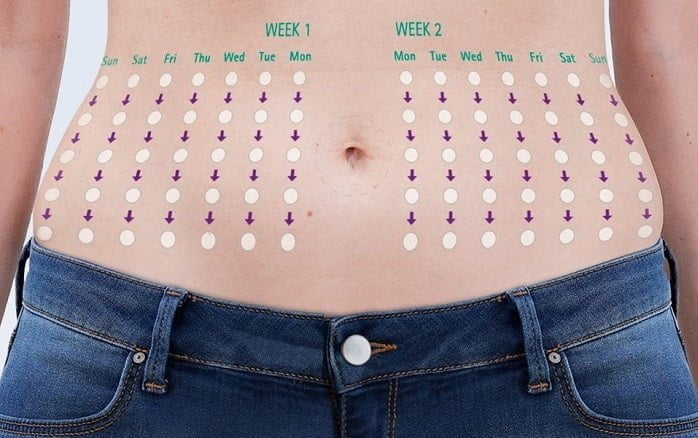
How to Rotate Insulin Injection Sites
Insulin injection site rotation means changing the exact spot while keeping a predictable pattern. The simplest method is to divide a region into zones. Use one zone for several injections, move a finger-width each time, then switch to another zone.
For the abdomen, imagine four quadrants around the belly button. Use the right upper area, then right lower, then left lower, then left upper, or any pattern you can remember. Within each quadrant, move across small points in rows. For the thigh, work down one outer section, then move to the other leg.
Many people benefit from an insulin injection site rotation chart. A paper grid, phone note, or calendar can show where you injected last. Marking the site helps prevent accidental repeats, especially if you use insulin several times daily.
- Stay spaced: move at least one finger-width from the last mark.
- Check texture: skip hard, rubbery, or tender areas.
- Change needles: use a new needle as directed for each injection.
- Keep timing steady: avoid changing both site and schedule at once.
- Review patterns: bring your rotation notes to appointments.
Thickened fatty tissue from repeated injections is called lipohypertrophy. It may feel firm, rubbery, or lumpy. Insulin injected into these areas can absorb unpredictably. Rest those spots and ask a clinician to examine persistent changes.
Using Pens and Syringes With Better Technique
Good insulin technique starts before the needle touches the skin. Wash your hands, check the insulin name, and confirm the appearance matches the product instructions. Cloudy insulins may require gentle mixing, while clear insulins should not look clumped or discolored.
For an insulin pen, attach a new needle and prime according to the device instructions. Choose healthy skin, insert at the planned angle, press the dose button fully, and keep the needle in place for the recommended count. This pause helps reduce leakage from the site.
For a vial and syringe, draw the dose carefully and check for visible air bubbles. Insert the needle smoothly, inject at a steady pace, then remove it at the same angle. Dispose of the needle or syringe in a proper sharps container.
If you want a separate pen walk-through, Lantus SoloStar Insulin Pen explains pen handling concepts for that device type. Rapid-acting pen users may also find Apidra SoloStar Pen Uses useful for broader context around mealtime insulin discussions.
Needle Choice Can Affect Comfort
Short, fine needles often reduce discomfort and may lower the chance of injecting into muscle. Needle choice still depends on your device, training, and body type. If you are reviewing supplies with your clinician, product pages such as BD Nano Pro Pen Needles and BD Ultrafine II Syringes can help you compare device categories and terminology.
Site-Specific Tips for Abdomen, Thigh, and Arm
For insulin injection in stomach areas, relax the abdominal muscles before inserting the needle. Avoid the navel, beltline friction, surgical scars, stretch marks that feel thickened, and any irritated skin. The abdomen is often easy to rotate because it offers a larger surface area.
For insulin injection in thigh areas, use the front or outer upper thigh. Avoid the inner thigh, which has more sensitive structures and may rub during walking. If you plan activity that uses the legs, ask your care team how timing and site choice may affect your routine.
For insulin injection in arm areas, aim for the fatty tissue on the back of the upper arm. This site can be difficult to reach accurately. If you cannot see or stabilize the area, another site may be safer unless someone trained can help.
The safest place to inject insulin is usually the site you can reach, see, rotate, and inject into correctly. For many adults, that is the abdomen. For others, the thigh or buttocks may be more practical. The best insulin injection sites are the ones that support consistent technique without repeatedly stressing the same tissue.
Common Problems: Lumps, Redness, Bruising, and Leaks
Small bruises can happen when a tiny blood vessel is nicked. They usually fade on their own. Avoid injecting into a fresh bruise because it may be sore and may not absorb insulin predictably.
Firm lumps or rubbery patches may suggest lipohypertrophy. Give those areas a rest and rotate to normal-feeling skin. If a lump after injection in stomach areas grows, becomes painful, or does not soften, ask a clinician to assess it.
Redness, warmth, swelling, pus, or red streaks can signal infection or significant irritation. Widespread hives, facial swelling, trouble breathing, or severe dizziness require urgent medical help. Do not ignore repeated unexplained highs or lows, especially when they appear after a change in sites, needles, or injection angle.
Leaking after an injection may occur if the needle is removed too quickly, the dose is large, or the pen button was not held down long enough. Keep the device steady and follow its recommended hold time. Do not take extra insulin to replace leaked insulin unless a clinician has told you exactly how to handle that situation.
Practical Injection Checklist
A consistent routine can make insulin injections easier to review and troubleshoot. Use this checklist as a technique prompt, not as a substitute for your prescribed plan.
- Confirm insulin: check the label before each dose.
- Inspect appearance: look for clumps, particles, or color changes.
- Prepare device: attach, prime, or draw up as instructed.
- Select skin: choose soft, healthy tissue.
- Set angle: use the angle taught for your needle and body type.
- Inject steadily: keep the device stable during delivery.
- Pause briefly: allow full delivery before removing the needle.
- Record site: mark the area on your rotation chart.
If injection technique remains difficult, a diabetes educator can watch a practice injection and adjust technique details. Bring your pen, syringe, needles, and rotation notes to that visit.
Authoritative Sources
For broad patient education on insulin use and safe injection technique, review the MedlinePlus insulin injection instructions.
For diabetes medication and insulin basics, the American Diabetes Association insulin overview explains common insulin concepts in patient-friendly language.
For technique research and safety considerations, the peer-reviewed review The Injection Technique Factor discusses needle length, site rotation, and tissue changes.
Final Notes on Safer Insulin Injections
Insulin injections work best when the site, angle, and rotation plan stay consistent. Use soft fatty areas, avoid damaged skin, and change the exact spot each time. If your glucose readings become less predictable, review technique before changing your routine.
You can browse more related education in the Diabetes Articles section. CanadianInsulin.com is a prescription referral platform, and prescription details may be confirmed with a prescriber where required; product access and fulfillment depend on licensed third-party pharmacies where permitted.
This content is for informational purposes only and is not a substitute for professional medical advice.
