
OneTouch Verio is a family of blood glucose meters used for fingerstick checks at home. The Verio Flex model can help you track glucose patterns, but reliable results depend on correct setup, compatible strips, clean hands, and a testing plan from your care team. A meter reading is useful context. It does not replace lab testing, diagnosis, or medical advice.
Why this matters is simple: a home meter gives one result from one small blood sample at one moment. That number can help you notice patterns around meals, activity, stress, illness, and medicines when you record it clearly.
Key Takeaways
- Use matching strips: confirm the exact strip type in the meter manual.
- Set time first: wrong timestamps can confuse fasting and meal readings.
- Clean hands matter: food residue or moisture may distort a fingerstick sample.
- Review patterns: repeated highs, lows, or symptoms need clinical follow-up.
- Check device messages: do not treat error screens as glucose results.
How OneTouch Verio Flex Fits Into Home Glucose Checks
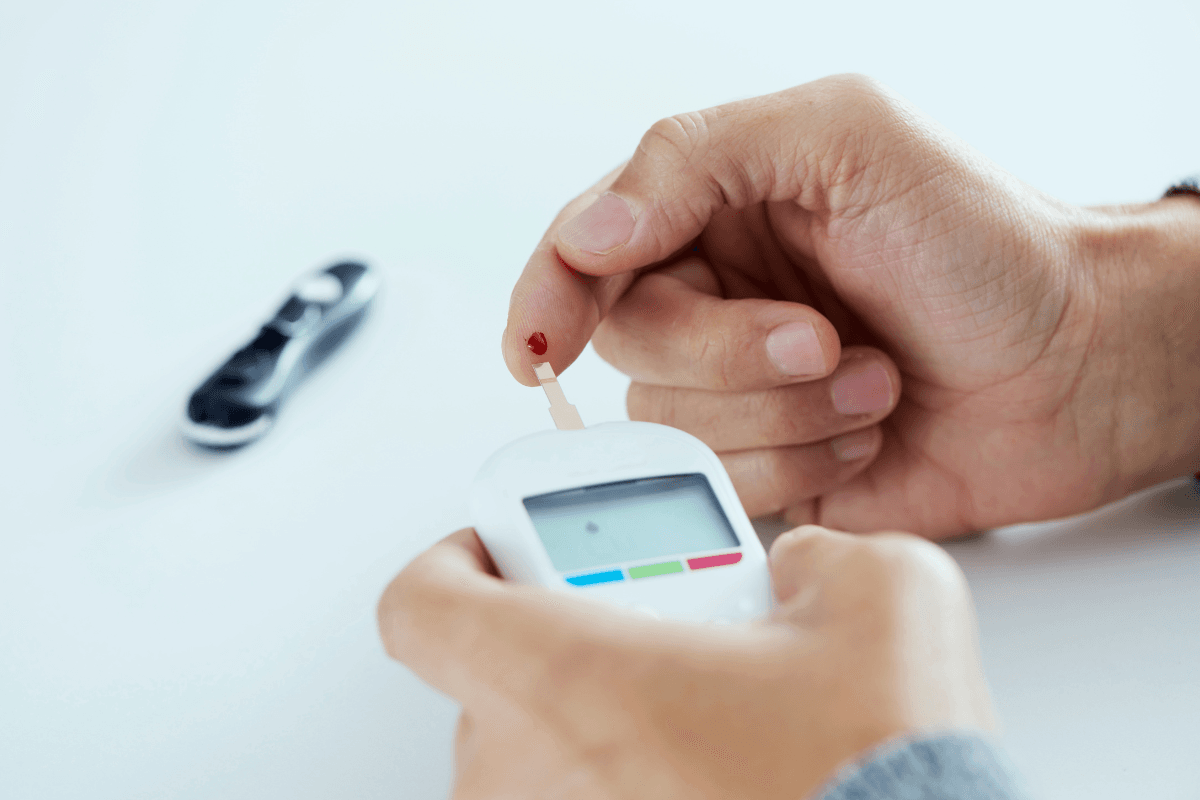
The OneTouch Verio Flex is a capillary blood glucose meter, meaning it measures glucose in a small drop of blood, usually from a fingertip. It is intended for self-monitoring outside the body. People may use it to understand how readings change before meals, after meals, at bedtime, during illness, or when symptoms occur.
The meter is one part of a larger tracking system. The full system includes the device, compatible test strips, a lancing device, clean lancets, safe disposal supplies, and a log you can review later. If you want a broader orientation before comparing devices, see this overview of Different Types Of Glucometers.
Searches often mix the Verio Flex with related models, such as OneTouch Verio Reflect. These meters may share some family naming, but setup screens, prompts, symbols, data features, and troubleshooting messages can differ. Use the manual for your exact model rather than another person’s routine.
If you are checking which device is being discussed, the OneTouch Verio Flex Meter page can help identify the product. Device-specific operating instructions should still come from the manufacturer’s manual and package materials.
Why it matters: Correct technique often affects reliability more than the meter name alone.
Setup Checks Before Your First Reading
Set up the meter before relying on your first result. Date and time settings matter because a misplaced timestamp can make fasting, before-meal, and after-meal readings hard to compare. If the meter pairs with an app, confirm that the meter and app show the same date and time.
Start with the instructions that came with your device. They should explain batteries, display symbols, strip insertion, sample application, cleaning limits, and when to use control solution. Control solution is a testing liquid with a known glucose range. It helps check whether the meter and strip system are working as expected.
- Confirm strip name: use the strip listed for your meter.
- Review expiry date: expired strips may be unreliable.
- Store strips correctly: keep the vial closed and dry.
- Set date and time: accurate logs need context.
- Use clean lancets: replace the lancet as instructed.
- Learn display symbols: check the manual before guessing.
OneTouch Verio test strips are not interchangeable with every meter, even if a strip looks similar. A strip must be designed for the specific meter system. If test strip handling is new, this primer on Diabetic Test Strips Use explains storage and handling issues that can affect readings.
Availability questions can also be confusing. Older meters, newer meters, and related models may appear side by side. If you wonder whether a model has been discontinued, check current manufacturer information or ask a pharmacist or supplier. Do not rely on old listings alone.
How To Use The Meter Without Common Sampling Errors
Using the meter usually involves preparing the strip, obtaining a small blood sample, applying the sample correctly, and saving the result with enough context. The exact sequence can vary by model, so follow the OneTouch Verio Flex manual instead of memory.
- Wash your hands with soap and warm water, then dry them fully.
- Insert the compatible test strip as described in the meter instructions.
- Use the lancing device on the side of a fingertip unless instructed otherwise.
- Apply blood only where the strip instructions show.
- Wait for the result, then record the time and situation.
- Discard the used lancet and strip safely under local rules.
Many people ask why some instructions mention wiping away the first drop of blood. Food, lotion, fruit juice, or moisture on the skin can affect a sample. If hands are clean and dry, some meter instructions may allow the first drop. If hands cannot be washed, or if the result does not match symptoms, your care team may suggest retesting with a fresh sample.
Finger choice can also affect comfort. The side of a fingertip is commonly used because it may hurt less than the fingertip pad and can still provide a usable sample. Rotate fingers when possible to reduce soreness. If lancing is difficult, this overview of Lancets For Blood Sugar Testing explains selection and safety basics.
Testing time should not be guessed. Common checkpoints may include fasting, before meals, after meals, bedtime, during symptoms, or during illness. Your clinician may recommend different timing if you use insulin, take medicines that can cause hypoglycemia (low blood sugar), are pregnant, or have frequent unexplained readings.
Quick tip: Write down meals, symptoms, illness, and activity beside unusual readings.
Understanding Results, Units, and When To Retest
A OneTouch Verio meter result gives one glucose value at one moment. It does not explain the cause by itself. A single high or low reading may reflect food timing, medication timing, exercise, stress, illness, strip handling, or sampling technique. Patterns are usually more useful than isolated numbers.
Units can create confusion. In Canada and many other countries, glucose is commonly shown in mmol/L. In the United States, mg/dL is common. The converter below helps compare logs or instructions that use different units. It does not interpret whether a result is safe for you.
Blood Glucose Unit Converter
Convert glucose readings between mg/dL and mmol/L without changing the clinical value.
These calculations are for education only and do not replace clinical advice, diagnosis, or treatment. Always confirm medical decisions with a qualified healthcare professional.
If you are unsure how your targets are defined, review them with your diabetes care team. Personal targets can differ by age, pregnancy, medications, kidney disease, hypoglycemia risk, and other health factors. People comparing meter results with broader diabetes information can browse the Diabetes Articles collection.
Symptoms should carry weight. Hyperglycemia (high blood sugar) can cause thirst, frequent urination, fatigue, blurry vision, or nausea. Hypoglycemia can cause sweating, shakiness, confusion, weakness, or fainting. If symptoms and a meter result do not match, wash your hands, retest if appropriate, and seek clinical guidance when symptoms are severe or persistent.
Do not make major treatment changes based only on one unexpected number. Instead, check the basics first: clean hands, fresh compatible strip, correct sample placement, and no visible error message. If the repeated result still conflicts with symptoms, contact a clinician or pharmacist.
Test Strips, Control Solution, and Compatibility
OneTouch Verio test strips are designed for compatible Verio-family meters, but you should still check the strip package and meter manual before testing. A strip that fits physically is not enough. The meter system must be designed and labelled for that strip.
If you are checking the specific supply, the OneTouch Verio Test Strips page can help identify the item being discussed. Use the package insert for storage limits, control ranges, and instructions after opening a vial.
Control solution can be useful after a new strip vial is opened, if the meter has been dropped, if results seem unusual, or when the manual recommends a check. A control result outside the printed range does not diagnose a glucose problem. It suggests the meter, strip, solution, or testing technique needs review before relying on patient readings.
Some supplies may have different documentation or reimbursement requirements depending on product, payer, and location. Where required, CanadianInsulin.com may help confirm prescription details with the prescriber, while dispensing and fulfilment are handled by licensed third-party pharmacies where permitted.
Troubleshooting Messages and Accuracy Factors
Most meter problems are practical rather than mysterious. Slow down and check the basics before drawing conclusions. Strip type, strip expiry, sample size, battery status, display symbols, and a clean strip port all matter. Do not use a reading for treatment decisions if the meter clearly shows an error state.
- Small sample: the strip may not fill correctly.
- Wet hands: water may dilute or spread blood.
- Food residue: sugar on fingers may raise results.
- Old strips: expiry and storage can affect performance.
- Temperature extremes: meters and strips have use limits.
- Low battery: power issues can interrupt testing.
The PC message is a common source of confusion. On some meter systems, PC may relate to communication with a computer, app, or data-transfer mode. Check the exact manual for your model. Treat it as a device message, not as a blood glucose result.
If the meter will not turn on, the display looks unusual, or repeated errors appear, review the manual’s troubleshooting section. You may need a battery check, a fresh strip, a control solution test, or manufacturer support. If the number seems impossible and symptoms are present, treat symptoms seriously and seek clinical help.
Comparing Related Meters and Tracking Options
The right meter is the one you can use correctly and consistently. Some people prefer a simple display. Others need app pairing, data sharing, or a device that is easier to hold. Related meters may offer different prompts or data tools, but those features only help if they fit your daily routine.
Decision factors that matter
- Strip access: confirm ongoing access to compatible strips.
- Display readability: large numbers may reduce mistakes.
- Data capture: logs or apps can support pattern review.
- Dexterity needs: strip handling should feel manageable.
- Care-team workflow: choose records your clinician can review.
If you are comparing device features, Best Glucometer For You covers practical points to consider. For a broader how-to resource, How To Use A Glucometer explains general meter use and logging habits.
Continuous glucose monitors, lab glucose tests, and home meters answer related but different questions. A home meter can help with immediate fingerstick checks. A lab test may be used for diagnosis or broader assessment. A continuous glucose monitor shows trends over time, but readings can lag behind blood glucose during rapid changes.
The devices some people wear on the arm are usually continuous glucose monitors, not fingerstick meters. They may reduce the number of fingersticks for some users, depending on the system and care plan. They are not automatically better for every person, and they still require correct use and interpretation.
When To Ask For Clinical Help
Ask for clinical guidance if readings are repeatedly outside your agreed target range, if you have frequent hypoglycemia, or if you cannot explain a sudden change in patterns. Do the same if illness, vomiting, dehydration, pregnancy, new medicines, steroid use, or major diet changes affect your results.
Seek urgent care for severe symptoms such as confusion, fainting, chest pain, trouble breathing, severe weakness, repeated vomiting, or signs of dehydration. People who have been told to check ketones should follow their care plan during illness or sustained high readings. Do not stop, start, or change diabetes medicine based only on a general article.
Bring your meter, strips, control solution if used, and written or app-based log to appointments when readings seem inconsistent. This gives your care team more context than a single number. If you are browsing supplies by condition, the Diabetes condition collection can help with navigation, but it should not replace clinical advice.
Authoritative Sources
- The American Diabetes Association explains blood sugar checking and why monitoring may be recommended.
- Official OneTouch Canada Verio Flex information supports model-specific feature checks.
- Health Canada medical device information provides regulatory context for devices.
Use the device manual for model-specific instructions, and use your care plan for target ranges and testing frequency. OneTouch Verio readings are most useful when they are accurate, well documented, and reviewed in the context of symptoms and clinical goals.
This content is for informational purposes only and is not a substitute for professional medical advice.

